

Hypothesis-Driven Problem Solving: A Practical Guide
You have two weeks, a question the room disagrees about, and a data pull that takes three days to arrive. The decision is not whether to be rigorous. It is whether to spend week one mapping every possible cause, or to write down the answer you already suspect and spend week one trying to destroy it. Hypothesis-driven problem solving is the second route. Done well it produces a defensible answer in days. Done badly it is confirmation bias with a project plan attached. This guide covers the difference: the day-one claim, the hypothesis tree that turns it into a testing sequence, three worked examples, and the moment the evidence should make you throw your own hypothesis away.
Quick answer: what is hypothesis-driven problem solving?
Most teams meet this method as a rule about speed. It is really a rule about order. Nothing in it says work faster or look at less data. It says decide what you think the answer is before you analyse, so every hour afterwards is aimed at one sentence that could be false.
Hypothesis-driven problem solving is a method for answering a business question by stating a candidate answer first and then trying to disprove it. You write a day-one hypothesis as a full sentence you could be wrong about, break it into three or four sub-claims that must all be true for it to hold, and run the cheapest analysis that could kill the weakest one. Evidence revises the hypothesis, never the reverse. It suits questions where you already have a signal pointing somewhere. When you have no candidate answer at all, map the question with an issue tree first and come back once one branch looks strongest.
How we judged this method against the alternatives
Hypothesis-driven work is one of five ways a team gets to an answer, and not the right one every time. Each approach below was judged against the same five questions, asked about a real two-week piece of work rather than a case interview:
- What you need before you can start, because some require a prior view and some require only access to the data.
- Time to an answer somebody else would defend in a review, not time to a first chart.
- How the approach fails, because each fails characteristically and you can only guard a failure you can name.
- What evidence it leaves behind: a measured effect, a bridge somebody can re-run, a set of quotes, or a story.
- Where it belongs in the arc of a piece of work, because none of them wins the whole engagement.
Ignored on purpose: how a method sounds in a job interview, and every claim about percentage time saved that could not be traced to a published study. That filter removes most of what is written about this subject, including the familiar promise of eighty percent of the answer in twenty percent of the time, which nobody can source.
Key takeaways
- You need a signal, not a hunch. If you cannot name the interview, outlier or unexplained variance that made you suspect the answer, you are guessing with extra steps. Map the question first and come back when one branch looks strongest.
- Order beats effort. The sequence that gets you to an answer is cheapest-kill-first: run the test with the highest chance of destroying the claim per hour spent, not the one easiest to schedule or most pleasant to run.
- Assume the first hypothesis is wrong. Ron Kohavi and Stefan Thomke reported in Harvard Business Review that at Google and Bing only about 10 to 20 percent of tested ideas produce positive results. Analysis has no better hit rate than experimentation does.
- The evidence you leave behind is not interchangeable. An experiment yields a measured effect, a hypothesis test yields a bridge somebody can re-run, an interview round yields testimony. Decide which the decision needs before you pick the method.
- Nothing wins the whole engagement. Most real work maps first, commits second and tests third. The skill is knowing which week you are in, and noticing the day the map has done its job.
Five ways to answer a business question, compared
The same five criteria, applied to every approach. Rows are alphabetical, not ranked, and most engagements use two or three in sequence.
| Approach | What you need to start | Time to a defensible answer | How it fails | Evidence it leaves behind | Where it belongs |
|---|---|---|---|---|---|
| Controlled experiment (A/B test) | A reversible change and enough live traffic to detect a small effect. | Days to weeks, set by sample size rather than by effort. | Underpowered tests read as null, so a real effect is filed as no effect. | A measured causal effect. The strongest artefact on this list. | Product and pricing changes you can ship to a slice of users. |
| Hypothesis-driven problem solving | One signal pointing at an answer: an interview, an outlier, an unexplained variance. | Days. The first kill test usually lands inside 48 hours. | Confirmation bias: hunting evidence for a sentence you already wrote. | A validated claim and the analyses that survived an attempt to break it. | From the moment mapping produces a candidate answer worth attacking. |
| Issue-tree-first mapping | Nothing but the question. The route when you have no candidate answer. | A week or more before the structure stops moving. | Boiling the ocean. Every branch looks like it deserves a workstream. | A defensible structure, which is not yet a finding. | Week one, and again each time a hypothesis dies. |
| Open-ended data exploration | Access to the data and an analyst with time. No prior view needed. | Unbounded. It ends at the deadline, not at the answer. | Correlations nobody asked about, with no way to rank them. | Charts. Persuasive live, hard to defend when asked why that cut. | Short scoping pulls that feed a hypothesis, not the method itself. |
| Root-cause analysis (5 Whys, fishbone) | A recurring defect in a process you control, clearly defined. | Hours for the session, then as long as the fix takes to verify. | Digs deeper into the problem as defined instead of questioning the definition. | A causal chain agreed by the people who run the process. | Operations and quality problems, not open strategy questions. |
Read the first and last columns together: they decide the choice. The middle three say what you are buying.
Hypothesis-driven problem solving, step by step
Six steps turn an early signal into an answer with evidence under it. Step three is the one most teams skip, and skipping it turns the method into an expensive way of confirming what somebody already believed.
Write the day-one hypothesis as a claim, not a question
State your best current answer as one sentence you could be wrong about. Margin fell because input costs rose faster than price is a hypothesis. Why did margin fall is a question, and a question gives a team nothing to test.
Break the claim into the sub-claims that must all hold
Split it into three or four MECE parts, each of which must be true for the whole claim to survive. If one fails, the hypothesis is wrong or incomplete, not merely weaker.
Write down, in advance, the result that would kill each one
Before you look at any data, name the finding that would falsify each sub-claim. A sub-claim with no defined killing result is a topic, not a claim.
Rank the tests by kill per hour and run the top one
Score each test on hours taken and chance of destroying the claim, then run the highest ratio first. One half-day test can retire a hypothesis before you spend a week on the rest.
Let the evidence revise the hypothesis, not the reverse
When a test disagrees with the claim, change the claim. Do not reinterpret the data, add exceptions, or narrow the wording until it fits what you believed on Monday.
Restate, and stop when every sub-claim has evidence under it
Write the revised hypothesis and its sub-claims out again, then run the cycle. Stop once each has a number behind it, not once the story sounds plausible.
Step two applies the same test an issue tree applies to its branches, aimed at sub-claims instead. For the test itself, and for worked examples outside hypothesis work, see our guide to the MECE principle.
Hypothesis-driven approach: what does it actually mean?
A hypothesis-driven approach reverses the default order of work. The default is gather, look, conclude. This version concludes first, provisionally and in writing, then spends the analysis budget attacking that conclusion. The word that makes it a method rather than an opinion is falsifiable: the claim must be the kind of sentence a specific, obtainable piece of evidence could show to be false.
There is an obvious objection, and it is a good one. Committing early is exactly the failure mode Thomas Wedell-Wedellsborg documented in Harvard Business Review in January 2017: in surveys of 106 C-suite executives from 91 companies across 17 countries, 85 percent agreed their organisations were bad at diagnosing problems, and 87 percent said the flaw carried real costs. Managers, he wrote, tend to "switch quickly into solution mode without checking whether they really understand the problem".
One rule separates the method from that failure mode: the day-one hypothesis is written to be attacked, and a sub-claim that fails takes the whole claim down with it. A team that cannot name the finding that would change its mind is not running this method, whatever the workplan says. When the framing rather than the answer is in doubt, map it first with an issue tree and only then commit.
The trade-off: committing on day one buys a testing sequence and costs you peripheral vision. Everything outside the hypothesis goes unexamined until something forces it into view, which is why the cheap test of a background assumption is worth running first.
Hypothesis-based problem solving: how do you write the day-one hypothesis?
Hypothesis-based problem solving lives or dies on the first sentence. A usable hypothesis names a subject, a mechanism and a direction, and survives one check: could evidence you can actually get show it is false? Pricing is a challenge fails that check. Margin fell because unit costs rose faster than realised price passes it, because a purchase price variance settles it either way.
Not a hypothesis
- Why is churn rising?
- We should look at our pricing.
- There may be inefficiencies in the supply chain.
A hypothesis
- Churn is rising because accounts that never reach two active seats leave at renewal.
- List price is right and realised price is not, because discount approval sits too low.
- Freight cost per unit rose because volume shifted to a lane with no contracted rate.
Then break it into three or four sub-claims that must all hold. Fewer than three usually means one sub-claim is two ideas wearing a single label; more than four is a list rather than a logic, and will not be testable inside a week.
The trade-off: a sharp hypothesis is easy to test and easy to fall in love with. The sharper the sentence, the more deliberate you have to be about writing down, in advance, what would make you abandon it.
Hypothesis-driven analysis: how do you design a test that could kill the claim?
Hypothesis-driven analysis is where the method earns its reputation or loses it. Each sub-claim gets one analysis, picked because it could falsify the claim rather than because the data is handy. Before the pull runs, write the killing result down: if the mix bridge shows private label above a fifth of units, the price-cost claim is dead.
People are reliably bad at this. In Peter Wason's rule-discovery task, people generate examples that fit the rule they already suspect rather than examples that would break it. Reviewing that literature in the Journal of Intelligence in 2023, Branchini, Burro and Bianchi note first-attempt success rates of roughly 20 percent; their own control group reached 36.7 percent, while a group trained to think in opposites, generating the contrary case on purpose, reached 78.3 percent. The fix is not intelligence. It is being made to write the opposite down.
The other fix is prospective hindsight. Gary Klein's premortem, published in Harvard Business Review in September 2007, rests on 1989 research by Deborah Mitchell, Jay Russo and Nancy Pennington finding that imagining an event has already happened raises the ability to identify reasons for it correctly by 30 percent. Here it takes ten minutes: assume the hypothesis has already been proven wrong and ask the team which sub-claim killed it. That answer is your first test.
Then rank: hours to run against the chance it destroys the claim, highest ratio first. That is why a two-hour query beats the elegant model that needs a week of data engineering.
The trade-off: a test built to falsify is less impressive than one built to illustrate. You produce fewer beautiful charts and reach a defensible answer sooner, and only one of those is what the meeting is for.
Hypothesis tree: how do you turn one into a testing sequence?
A hypothesis tree holds an assertion at the root instead of a question, and the branches under it are the conditions that must all be true for it to survive. Those branches are conditions rather than alternatives, which is the whole difference from an issue tree: there, exactly one branch holds the answer. For how to build, restructure and present the tree itself, our guide to issue trees covers the mechanics and the contrast in more depth. This section is about the thing the tree is for once it exists: the order you test it in.
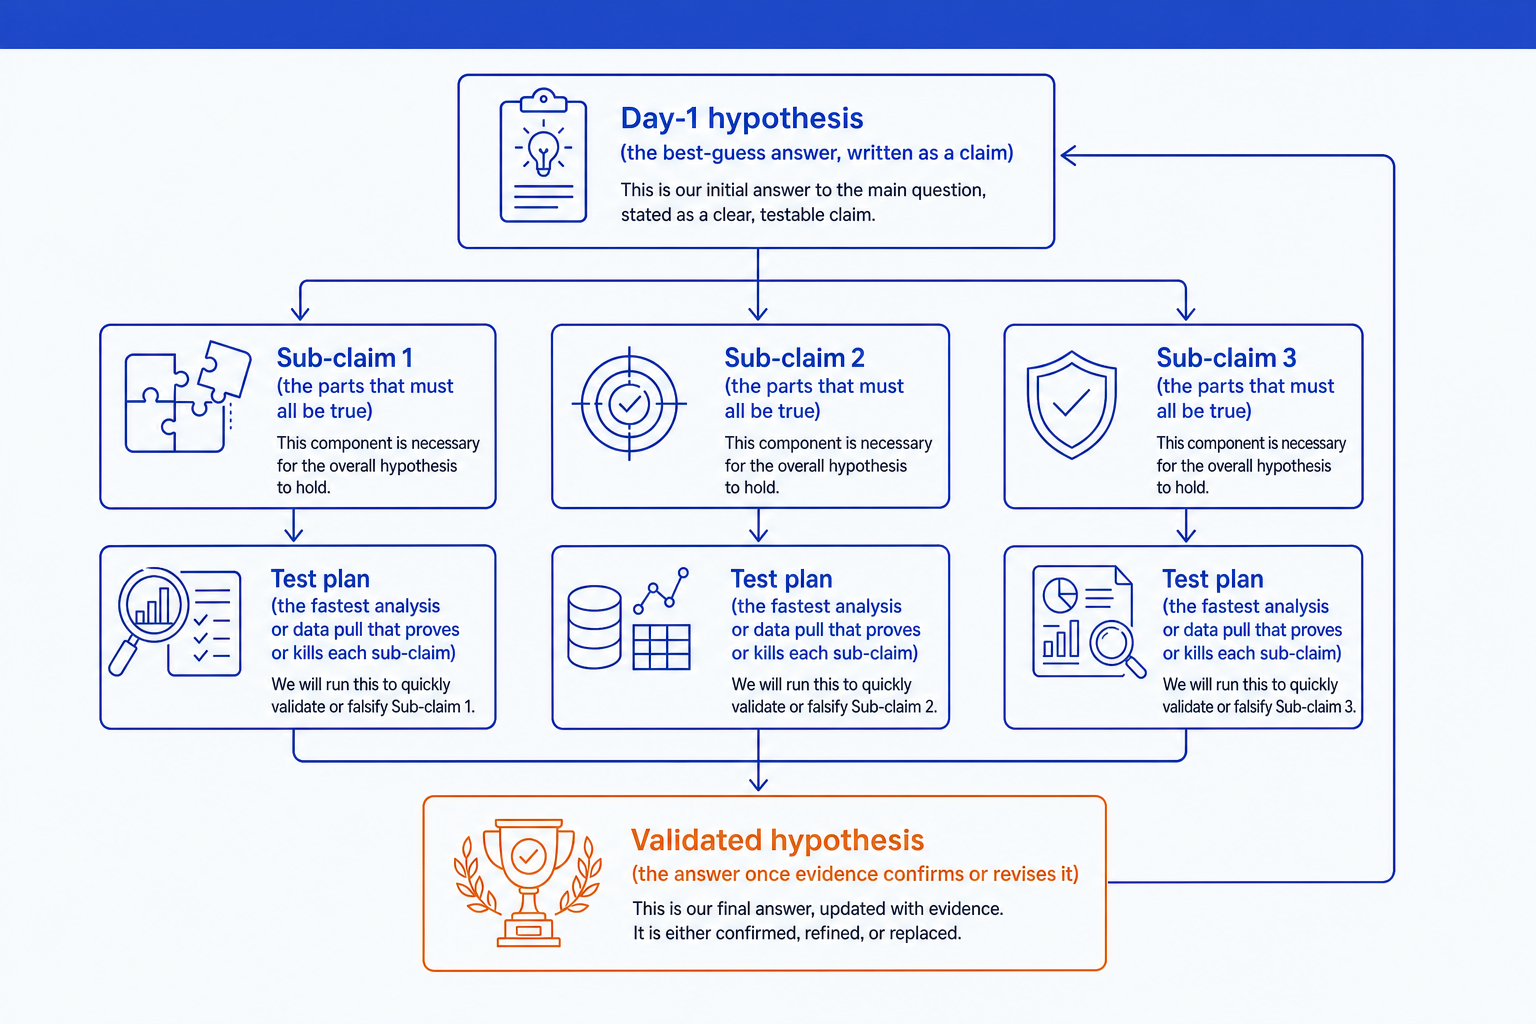
Read the tree bottom-up, not top-down. Every leaf carries three annotations, and if they are missing the tree is decoration:
The test. The one analysis that settles this leaf, named precisely enough that somebody else could run it without asking what you meant.
The cost. Hours, honestly estimated, including the wait for access. A test needing a week of data engineering is a different object from a two-hour query.
The kill probability. Your honest guess at the chance this leaf is false. Low-cost, high-kill tests go first, whatever order the tree is drawn in.
Then find the load-bearing node. In most hypothesis trees one leaf, if false, collapses more of the structure than any other, because the branches above quietly assume it. In the margin example below it is not cost or price but the assumption that mix stayed stable, the sub-claim nobody would have written down without the tree. Test that leaf first even when its kill probability looks low: its failure changes the question, not the answer.
The trade-off: annotating every leaf with cost and kill probability takes an hour that feels like planning rather than progress. It buys back the days a team otherwise spends testing in the order the tree happens to be drawn.
Worked example: why did gross margin fall four points?
This is the method under real conditions. The interesting part is not that the hypothesis was validated, but that it was not, and that the cheapest test is what revealed it.
The question
Gross margin at a B2B distributor fell four points over twelve months. Why?
Day-one hypothesis
Margin fell because purchase costs rose faster than we passed them through to customers, and contract renewal cycles delayed the pass-through.
Sub-claims that must all hold
Unit purchase costs rose materially over the period.
Realised price did not keep pace with those costs.
Product and customer mix stayed broadly stable, so this is a price-cost story.
Tests, cheapest kill first
- Mix bridge from the order book, half a day. Cheapest, and the only one whose failure changes the question.
- Purchase price variance by category from the ERP, one day.
- Realised price by contract cohort against list, one day.
What the analysis showed
The mix bridge, run first because it was cheapest, showed private-label volume moving from roughly a tenth of units to more than a quarter. Purchase costs had risen about three percent and realised price about four, so the price-cost story pointed the wrong way.
How the answer changed
The price-cost hypothesis died on day one. The replacement claim was that a volume-based rebate was pushing reps toward the lowest-margin line, with its own sub-claims and tests. The recommendation became an incentive rule, not a price rise.
Note the sequence. The mix bridge was third in importance and first in the running order, because it was cheap and it tested the assumption the other two sub-claims silently depended on. Run it last and the team spends a week on a bridge answering a question nobody has.
The trade-off: the day-one hypothesis was wrong and the week was still well spent, but only because it died on day one. The same claim dying in week two takes the budget that funded its replacement.
Worked example: why is enterprise churn rising?
The competitor explanation is the most common day-one hypothesis in a churn review, and usually the one the commercial team arrives already believing. That makes the falsification discipline harder and more valuable.
The question
Enterprise logo churn has doubled in two quarters. What is causing it?
Day-one hypothesis
Churn is rising because a competitor has undercut us on price, and the accounts leaving are the ones most exposed to that pricing.
Sub-claims that must all hold
Departing accounts cite price as the reason they left.
Churn is concentrated in the segments where the competitor is actually present.
Accounts offered a discount at renewal stay at a materially higher rate.
Tests, cheapest kill first
- Code the exit reasons already in the CRM, two hours. Almost free, and if price barely appears the claim is finished.
- Churn rate by segment against competitor presence, half a day.
- Survival curve for discounted versus undiscounted renewals, one day.
What the analysis showed
Price appeared in a minority of coded exit reasons, weakening the claim without killing it. The segment cut then failed it outright: churn was no higher where the competitor was present. A usage cut nobody had planned showed most departing accounts below two active seats in their last sixty days.
How the answer changed
The competitor hypothesis was replaced by an onboarding one: accounts that never reach a working number of seats in the first quarter leave regardless of price. That claim survived its own tests, and the discount programme everyone had assumed was the remedy was dropped before it was funded.
The cut that produced the answer was not in the original plan, and that is normal. A test that weakens a claim suggests the next claim; the discipline is to write that new hypothesis down properly rather than bolt an exception onto the old one.
The trade-off: killing the competitor hypothesis meant telling a commercial team that the discount programme it had already socialised was aimed at the wrong problem. The method produces that conversation on purpose, and earlier than anyone wants it.
Worked example: the hypothesis that died in two hours
The shortest example here, and the clearest case for cheap kills first.
The question
Sales leadership wants budget for twelve more reps. Is headcount the constraint?
Day-one hypothesis
Revenue growth is capped by selling capacity, so the team needs more quota-carrying reps.
Sub-claims that must all hold
Existing reps are at or near practical selling capacity.
Pipeline coverage is sufficient that more reps would have deals to work.
Ramp time is short enough for new hires to pay back this year.
Tests, cheapest kill first
- Time-allocation sample from the activity log plus six rep interviews, two hours. Kills the request if reps are not at capacity.
- Pipeline coverage ratio by rep and segment, half a day.
- Historical ramp curve for the last two hiring cohorts, half a day.
What the analysis showed
The first test ended the debate inside an afternoon. Reps were spending a large share of the selling week on manual quote assembly and approval chasing, so capacity existed but was being consumed by administration.
How the answer changed
The hypothesis was replaced within two hours: the constraint was quoting cycle time, not headcount. The two remaining tests were never run, because the claim they were designed to support no longer existed.
Two of the three planned analyses were never run. Under an open-ended approach all three would have been, plus a segmentation nobody needed, and the answer would have arrived in week three with more charts and less conviction.
The trade-off: an answer reached in two hours is harder to sell than one reached in three weeks. Expect to spend some of the time you saved showing the room why the short path was the rigorous one.
Oria: how do you put a validated hypothesis on a slide?
A full cycle can run through several revised claims and a dozen tests, and none of it belongs on the slide. Presenting a validated hypothesis means showing the final claim and the evidence that survived, not the route you took:
Lead with the validated hypothesis. The final, evidence-backed claim is the action title. Not Hypothesis Test Results, and not a topic label.
Keep only the sub-claims that carried it. Two or three, each paired with the chart or number that proved it. Drop the ones confirmed instantly that added nothing.
Mark what changed since day one. If the hypothesis was revised, say so in one line. A reader trusts a claim more once they see it survived an attempt to kill it.
Put the accent colour on the proof, not the process. Reserve emphasis for the evidence that clinched the argument, never for the arrows showing how hard you worked.
This slide usually opens the recommendation section, right after the analysis that proved it. For how the deck sequences around that answer, see our guide to the executive summary slide.
Oria is built for that kind of document: corporate and consulting output, meaning board packs, steering committee decks, diligence exhibits, operating-model slides and dense frameworks held to an enforced corporate template. It reaches you two ways, as a PowerPoint add-in in the task pane on Windows, macOS and PowerPoint for the web, and as a connector for Claude and ChatGPT over MCP, so the slide can be built from the chat where the analysis was argued out. Describe the validated hypothesis in one line and it returns two to five editable design options in 30 to 40 seconds, on your own template.
The trade-off: Oria is built for the corporate environment only, so it loses on highly visual work. For a founder fundraising deck, a launch or campaign deck, a student presentation or a marketing one-pager, a design-led tool such as Gamma, Canva, Pitch or Beautiful.ai will beat it and look better doing it.
Prompts for drafting and stress-testing a hypothesis
The copy-paste prompts behind the method above: draft the claim, attack it, then render the answer. The first two are for Claude, the last for Oria. Replace the bracketed parts with your own question.
Draft and attack the hypothesis in Claude
Draft the day-one hypothesis from early signals
Run a premortem and rank the tests by kill per hour
Build the slide in Oria
Render the validated hypothesis as a diagram
Tip
Ask for the premortem before the test plan. A model asked to design tests will design tests that succeed; a model asked why the claim failed will find the sub-claim you were avoiding. For the wider set of methods this sits inside, see our management consulting frameworks field guide.
Which approach should you use?
Hypothesis-driven work is the right default for an open business question where a signal already exists. For everything else here, go elsewhere:
| If you need | Go to | Why |
|---|---|---|
| To map a question you have no answer to | Issue trees | An issue tree is built to be exhaustive, a hypothesis to be killed. Start with the tree when you have nothing to kill yet. |
| To check a structure for overlaps and gaps | The MECE principle | Sub-claims that overlap or leave a gap can all pass while the hypothesis above them stays unproven. |
| To settle a reversible product change with live traffic | A controlled experiment | Kohavi and Thomke's figures are the argument: at Microsoft roughly a third of tested ideas help, a third do nothing and a third hurt. Opinion does not sort them. |
| To fix a recurring defect in a process you run | Root-cause analysis | 5 Whys and fishbone are built for operational failure with a clear definition, not for open strategy questions. |
| To see how this fits with the other methods | The frameworks field guide | Hypothesis work is one stage of an engagement. The guide covers what runs before and after it. |
| To put the validated answer on a corporate template | Oria | Built for board packs, steering committee decks and diligence exhibits, as a PowerPoint add-in and as a connector for Claude and ChatGPT. |
| To make a visually striking pitch or launch deck | Gamma, Canva, Pitch or Beautiful.ai | Design-led tools win when the job is visual impact rather than defensible content, and they will look better doing it. |
Common mistakes to avoid
Frequently asked questions
What is hypothesis-driven problem solving?
Hypothesis-driven problem solving answers a business question by committing to a candidate answer first and then trying to disprove it. You write a day-one hypothesis as a testable sentence, break it into three or four sub-claims that must all hold, and run the cheapest analysis that could kill the weakest. Evidence revises the hypothesis, not the reverse.
What is a hypothesis-driven approach?
A hypothesis-driven approach reverses the usual order of work. Instead of gathering data broadly and hoping a conclusion appears, you state the conclusion you suspect on day one and spend the analysis budget testing it. It is defined by what happens when a test disagrees with you: the claim changes. Without that rule it is an early opinion with a workplan attached.
What is hypothesis-driven analysis?
Hypothesis-driven analysis is the testing half of the method. Each sub-claim gets one analysis, chosen because it could falsify the claim rather than because it is convenient, and the killing result is written down before the data is pulled. Tests are ranked by doubt removed per hour.
What is a hypothesis tree?
A hypothesis tree puts an assertion at the root rather than a question, and the branches below are the conditions that must all be true for it to survive. It is read bottom-up as a testing sequence: each leaf carries a test, a cost and a probability it fails. An issue tree, by contrast, holds alternatives, only one of which contains the answer.
How do you write a good business hypothesis?
Name a subject, a mechanism and a direction in one sentence, then check that a specific, obtainable piece of evidence could show it is false. Costs rose faster than price, so margin fell is testable. Pricing is a challenge is not. If you cannot say what finding would make you abandon the sentence, it is not yet a hypothesis.
How do you avoid confirmation bias when testing a hypothesis?
Design the test before you know the answer and record in advance the result that would kill the sub-claim. Run the test most likely to disprove the claim first, not the one most likely to support it. Give somebody the explicit job of arguing the hypothesis is wrong, and treat a failed sub-claim as a result rather than a setback.
Is hypothesis-driven problem solving the same as the scientific method?
It borrows the falsification logic and drops most of the apparatus. Both state a claim in advance and test it against evidence that could refute it. Business work runs on incomplete data and a deadline, so a hypothesis is usually settled by the best available cut rather than a controlled experiment, and the honest version says which of the two you had.