

How to create a process flow slide that stays editable
To create a process flow slide that stays editable, draw each step as its own native shape, connect them with PowerPoint's connector tool glued to each shape's edge rather than loose lines, and never flatten the result into an image or convert it to SmartArt. Glued connectors follow a step automatically when you move it, so a later edit takes seconds instead of a rebuild. PowerPoint has no purpose-built process flow object, so most teams either hand it to Oria or accept a slide that breaks the first time someone touches it.
This guide covers when a process flow slide is the right choice, the anatomy of one built to stay editable, the manual build and its real gotcha, both Oria routes, Text to Slide for a new flow and Improve Design for a rough one, the exact prompts for each, and the mistakes that lock a flow into a picture. Everything you need is here.
When a process flow slide is the right choice
A process flow slide lays out a sequence of steps in time order, left to right or top to bottom, with a connector between each one and a decision point wherever the path branches. It is a common slide need across operations, transformation, and strategy work because most recommendations are not just an idea, they are a sequence someone has to execute, and a reader has to see that sequence in one glance to trust it.
Reach for a plain process flow when the message is the sequence itself, an approval process, an onboarding flow, an incident escalation path. When the message is instead who owns each step and where work hands off between teams, a swimlane process flow slide is the better fit. When the steps are phased across quarters or years rather than a single workflow, use a strategy roadmap slide instead. Match the framework to the message before you touch a shape.
The anatomy of a process flow slide built to stay editable
Five parts carry the whole slide, and the connectors are the part most builds get wrong.
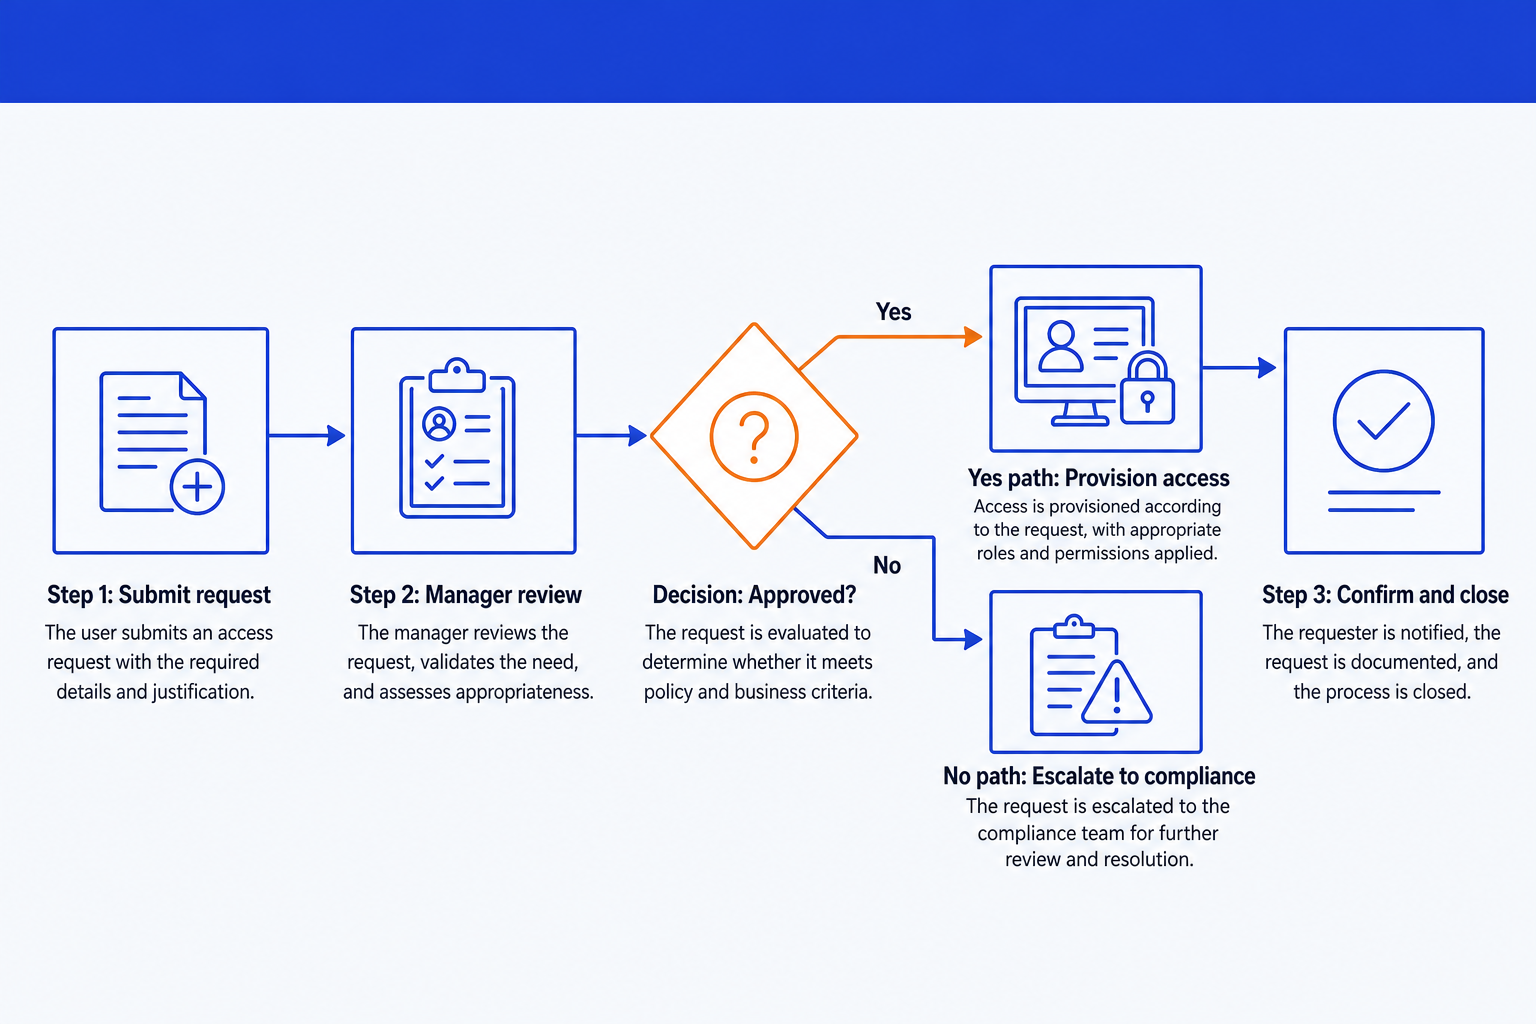
Step boxes. Each task or stage as its own native shape, placed in time order and sized consistently so no single step dominates the eye.
Glued connectors. Arrows joined to the edge of each shape using PowerPoint's connector tool, not freestanding lines, so the arrow moves with the step when you drag it.
Decision diamond. A diamond wherever the process branches, with each path labeled, such as approved or rejected, so the flow reads without a verbal walkthrough.
Consistent baseline. Every step box aligned to a shared baseline and evenly spaced, so a reader tracks left to right without the flow jumping up and down.
Action title. A full-sentence so-what across the top, naming the bottleneck or the decision the slide is really about, not just the process name.
The step-by-step manual build, and the gotcha that breaks editability
PowerPoint has no dedicated process flow object, so the build is shapes and connectors on a grid. Use the Shapes menu for the boxes and the Connector shapes, the ones with red endpoint handles, for every arrow. A plain line drawn with the Line tool looks identical but is not glued to anything.
List the steps in order. Write out each task or stage as a short verb-led label, in the exact sequence it happens. Five to seven steps is the readable range for a board slide.
Place the step boxes on a shared baseline. Drop each step as its own shape, sized and spaced consistently, left to right in time order, aligned to one horizontal grid line.
Connect them with glued connector arrows. Draw each arrow using the Connector shape, and drag its endpoint until it snaps to the edge of the shape, shown by a green circle. A glued endpoint moves with the shape; an unglued one does not.
Add the decision point. Insert a diamond wherever the process branches, label each path, and route the connector arrows from the diamond to each outcome.
Check every connector by dragging one step. Move a single step box a few inches. Every arrow attached to it should stretch and follow. Any arrow that stays behind was never actually glued.
Write the action title. Replace the topic label with a full-sentence so-what, such as the step where approvals stall the whole flow. The title is the slide; the flow is the proof.
Gotcha
Editability is not a finishing touch, it is a build decision made at every single arrow. A flow drawn with plain lines looks identical to one built with glued connectors right up until someone reorders a step and half the arrows stay frozen in place. Test every connector before you call the slide done, not after a reviewer asks for the one change that breaks it.
Two Oria routes: build new with Text to Slide, fix existing with Improve Design
Gluing dozens of connectors by hand and checking every one of them is exactly the kind of mechanical work that eats an evening. Oria removes it, and it covers both starting points. Text to Slide builds a process flow slide from scratch: you describe the steps and the decision point in one paragraph, and Oria designs the whole layout as native, editable PowerPoint shapes with the connectors already glued, in your corporate template.
Improve Design covers the other common starting point, a process flow someone already built that is misaligned, has a few floating arrows, or was pasted in as a flattened image from another tool. Point Improve Design at the existing slide and it aligns the steps, reconnects the arrows as glued native shapes, and applies your template's fonts and colors, without losing any of the steps you already wrote. For a rough deck with more than one weak slide, see the wider guide to improving ugly PowerPoint slides with AI redesign tools. Because both routes output native PowerPoint, every shape and connector stays movable afterward.
Text to Slide prompt for a new process flow
Improve Design prompt for an existing, broken flow
The prompts that make the process flow slide sharp
These are the exact copy-paste prompts we use to build a new flow, fix a broken one, and write the action title. The first four are for Oria inside PowerPoint; the last two are for drafting the sequence in Claude before you build. Replace the bracketed parts with your own process.
Build a new flow with Text to Slide in Oria
Lay out the steps and connect them
Add a decision point and branches
Fix an existing flow with Improve Design in Oria
Rebuild broken connectors and realign the steps
Write the action title on the flow
Draft the sequence in Claude first
Extract the steps and decision points from notes
Tighten the sequence to a board-ready length
Tip
Draft and tighten the sequence in Claude, then hand the clean steps and branches straight to Oria. For the full draft-to-deck method, see the consultant's guide to Claude.
Common mistakes to avoid
For the wider habits that keep AI-built slides editable and board-ready rather than generic, the consultant's guide to Claude covers the end-to-end method from analysis to deck. To map the same steps against the customer's experience instead of an internal process, see how to build a customer journey map slide.
Frequently asked questions
What makes a process flow slide stay editable in PowerPoint?
A process flow slide stays editable when every step is its own native shape and every arrow is a connector glued to the edge of the shapes it joins, not a loose line drawn on top. Move a step and a glued connector follows it automatically. The moment you flatten the flow into one image, convert it to SmartArt, or lock it into a single group, that editability is gone and any change means starting over.
What is the difference between a process flow and a swimlane diagram?
A process flow shows the sequence of steps in time order without saying who owns each one. A swimlane diagram adds a second dimension, grouping the same steps into horizontal lanes by role so ownership and handoffs are visible. Use a plain process flow when the message is just the sequence, and reach for a swimlane process flow slide when the message is who does what and where work changes hands.
How many steps should a process flow slide have?
Five to seven steps is the readable range for a board or steering-committee slide. Fewer than five and the flow can usually collapse into a couple of sentences. More than seven or eight and no single step gets enough visual weight to read at a glance. If your real process has more steps than that, group adjacent ones into a single stage or split the process across two slides.
Does PowerPoint have a built-in process flow tool that stays editable?
PowerPoint has the Shapes and Connector tools, which stay fully editable if you use the connector shapes, not plain lines, and glue each endpoint to a shape. SmartArt looks like a shortcut but converts your custom layout into its own rigid template and drops native shapes the next time you touch it. For a fast, on-brand build, Oria's Text to Slide renders the whole flow as native, glued shapes from one paragraph of text.
What is the fastest way to build a process flow slide that stays editable?
List the steps in order, name the decision point if there is one, and describe the handoff or bottleneck you want the title to state, then hand that to Oria's Text to Slide. Oria renders a fully editable native PowerPoint slide in your template, with step boxes, glued connectors, and a decision diamond already placed, so every element stays movable afterward instead of arriving as a flattened picture.